![Diane Poremsky [Outlook MVP]](http://www.outlook-tips.net/images/2014/MVP_BlueOnly.png)
IMAP Account
Setting up an IMAP account is similar to setting up a POP3 account, except it doesn't have a button for Test Account.
- Enter the display name you want to use – most people use their first name or initial and last name, but you can use your email alias (the part before the @ sign), your email address, or a nickname. Press Tab when finished.
- Enter your email address. Press Tab
- Enter your POP3 server name. Press Tab.If you don't know the server names check with your email provider.
- Enter your SMTP server name. Press Tab.
- Enter your user name. Most ISP require your email address, other use just the alias, Check with your provider if unsure.
- Enter your password.
- Add a check to Remember password, if desired.
- In most cases, the SPA box will be unchecked. If your mail provider uses SPA their documentation will tell you to check that box.

IMAP Account's More Settings:
The More Settings dialog for an IMAP account is identical to the dialogs (pictured above) used for POP3 accounts – EXCEPT for the Advanced tab (pictured below).

- General: Change the account name to a friendly name (by default it uses the incoming mail server name) and enter a Reply to address field and organization (company name) if desired. You only need to fill in the Reply to field if you want replies to go to a different account. For example, your ISP requires you to use the address they assigned you to send email but you want replies sent to a different mailbox
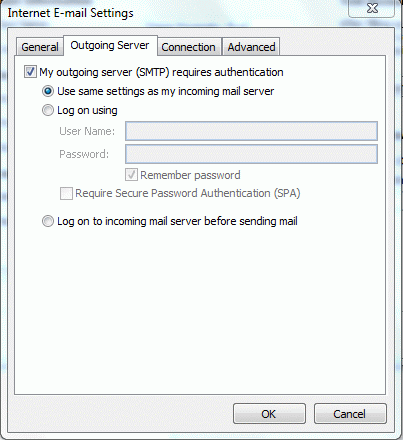
- Outgoing server: Use this tab to set your authentication methods. Check with your mail provider to find out what authentication method they use. In most cases, enabling the option to use the same as `settings as your incoming mail server won't cause problems, even if it's not required.
- Connection: This tells Outlook how you connect to the mail server. Most people will leave this tab on the defaults, but if you use a dialup account or VPN to connect to your server, select it here.
- Advanced: If you need to change your port numbers (such as to connect to AOL's SMTP server) change it on this tab. This tab is also used to change your time out's and set a Root path to your mailbox. In most cases, you don't need to fill in this path, but your email provider will give you the path if it's required.
HTTP Accounts
No longer supported. You'll need to use POP3 (any POP3 email client is supported) or the Outlook Hotmail Connector (Outlook 2003 and up only).
A link to the current connect versions in at the top of the right sidebar.
Published January 19, 2011. Last updated on May 5, 2017.
Related posts:
Pages: Page 1 Page 2